Showing posts sorted by date for query purchasing. Sort by relevance Show all posts

April 18, 2025

The Material Classification Code (MCC) feature in Oracle EBS Item Master Setup is essential for organizing and managing inventory effectively. This feature was added in 12.2.6 and later enhanced in 12.2.10. Businesses leverage this feature for several key use cases:

1. Inventory Organization & Segmentation

  • Helps categorize items based on their nature, such as raw materials, finished goods, consumables, or hazardous materials.

  • Facilitates better searchability, reporting, and grouping of items in inventory.

2. Compliance & Regulatory Tracking

  • Essential for industries like pharmaceuticals, chemicals, and aerospace, where strict regulations govern material handling.

  • Allows companies to classify materials based on safety regulations, hazardous handling requirements, or environmental constraints.

3. Pricing & Cost Control

  • Enables businesses to assign unique classification codes that can be used to apply specific pricing models, taxes, or cost tracking.

  • Helps in budget planning and cost analysis, ensuring proper cost allocation based on material type.

4. Supplier & Procurement Optimization

  • Helps in supplier-specific classifications, allowing procurement teams to streamline ordering processes.

  • Assists in bulk purchasing decisions, determining reorder points for different material categories.

5. Forecasting & Demand Planning

  • Supports predictive analytics, helping businesses anticipate material consumption trends.

  • Enables optimized stocking levels, reducing the risk of shortages or overstock situations.

6. Production & Manufacturing Efficiency

  • Improves BOM (Bill of Materials) management, ensuring accurate material selection during manufacturing.

  • Helps in work order planning, ensuring the right materials are available at the right time for production.


Setup

1. Setup the Classification Type
Inventory Setup --> Lookup


2. Setup Classification Code
Inventory Setup --> Transactions --> Material Classification Code
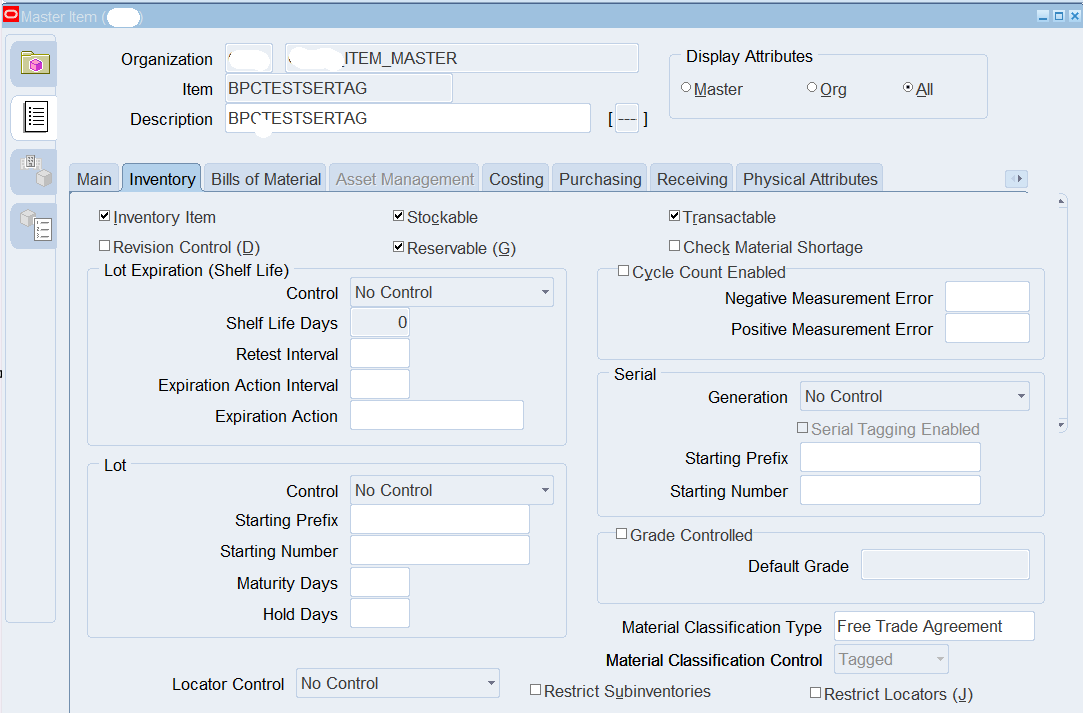
3. Assign to Item
Item Master --> Material Classification Type

4. Tag to Transaction Types
Actions--> Material Classification Tagging Assignments


Post this at all transaction level MCC will be maintained and traced.


Read More

August 8, 2023

Setting up Oracle Apps Manufacturing involves a series of configurations and setups to enable various manufacturing processes and functionalities.

  1. Organization Structure Setup:
    • Define Legal Entities, Operating Units, and Inventory Organizations:
      • Specify legal entities that represent distinct legal entities within your enterprise.
      • Set up operating units to manage financial transactions and business processes.
      • Define inventory organizations to manage inventory and manufacturing processes.
  2. Item Master Setup:
    • Define Items:
      • Specify item attributes like item type (standard, model, kit, etc.), description, and category.
      • Set up item relationships, such as substitutes, co-products, and by-products.
    • Item Costs:
      • Configure cost information, such as item cost organizations, cost methods (average, standard, etc.), and cost updates.
  3. Bill of Materials (BOM) Setup:
    • BOM Components:
      • Create BOMs with details of components and their quantities needed to produce finished goods.
      • Define alternate BOMs for different manufacturing scenarios.
    • Effectivity and Revision Control:
      • Set up effective dates and revision levels for BOMs.
      • Manage changes to BOMs through approvals and version control.
  4. Routing or Work Definition Setup:
    • Define Routings:
      • Create routings or work definitions that outline the sequence of operations required for manufacturing.
      • Specify resource requirements, work centers, operation sequences, and setup times.
    • Resource and Capacity Planning:
      • Set up work centers with capacity details, calendars, and scheduling rules.
      • Define resources like machines, labor, and tools required for operations.
  5. Work in Process (WIP) Setup:
    • WIP Parameters:
      • Configure WIP parameters like job and schedule classes, discrete job settings, and batch control.
    • WIP Accounting:
      • Define WIP accounting classes and categories for cost tracking and work order completion accounting.
  6. Quality Management Setup:
    • Quality Codes and Plans:
      • Create quality codes to categorize defects and issues.
      • Set up quality plans with inspection requirements, tests, and tolerances.
    • Quality Results:
      • Configure quality result types and result categories to track inspection results.
  7. Inventory Setup:
    • Inventory Organizations:
      • Create inventory organizations and define their parameters, such as valuation and costing information.
    • Subinventories and Locators:
      • Set up subinventories and locators for organizing and tracking inventory within inventory organizations.
  8. Purchasing Setup:
    • Supplier Setup:
      • Define suppliers and supplier sites for procuring raw materials or components.
    • Sourcing Rules and Purchase Agreements:
      • Configure sourcing rules to determine the supply sources for items.
      • Set up purchase agreements for volume discounts or long-term supplier contracts.
  9. Order Management Setup:
    • Order Types and Processing Rules:
      • Create order types for different sales scenarios (standard, drop ship, etc.).
      • Configure order processing rules for order fulfillment and shipping methods.
  10. Master Scheduling/MRP Setup:
    • Planning Parameters:
      • Set up planning parameters like planning method (MRP, Min-Max, etc.), netting method, and planning horizon.
    • Safety Stock and Demand Forecasts:
      • Define safety stock levels and establish demand forecasts for items.
  11. Costing Setup:
    • Cost Organizations:
      • Define cost organizations and their relationships to inventory organizations.
    • Cost Components and Roll-up:
      • Set up cost components to categorize costs (material, labor, overhead, etc.).
      • Configure cost roll-up processes to calculate and update costs.
  12. Shop Floor Control Setup:
    • Work Center Schedules:
      • Define work center schedules and operating hours.
    • Labor and Resource Reporting:
      • Configure labor and resource reporting for tracking work order progress.
  13. System Integration and Interfaces:
    • Data Import/Export:
      • Set up interfaces for data import/export between Oracle E-Business Suite and external systems.
    • Integration with Other Modules:
      • Configure integrations with other Oracle E-Business Suite modules like Financials, Procurement, and Order Management.
Read More

April 20, 2020


Basic PO setup

  • Basic Organization structure setup, BG, SOB, Calendar, Currency, Chart of Accounts, OU 
  • Porfile options 
  • Setup Inv Org with subinv and locators 
  • Setup UOM, Conversions 
  • Setup Items 
  • Setup Employee 
  • Setup Approval -- 
    • Job, Positions, Hierarchy 
    • Define Approval group, Assign Approval Group 
  • Set Up Oracle Workflow 
  • Decide How to Use the Account Generator 
  • Open Inventory and Purchasing Accounting Periods 
  • Define Buyers 
  • Set Up Document Controls 
  • Define Purchasing Options 
  • Set Up Financial Options 
  • Set Up Receiving Options 
  • Define Suppliers
Read More

August 1, 2018

Features and Overview of iProcurement

  • Web based applications allows organization to perform purchase activities 
  • It’s a self-service application module which enables buyers raise and work on requisitions and corresponding tracking 
  • Web based shopping interface for goods and services including requisitions for temporary rate based labor 
  • Complete Catalog and Contents management 
  • Online Approvals management 
  • Streamlined order placement in integration with Purchasing 
  • Streamlined with Sourcing to complete the RFQ negotiation cycle 
  • Complete Order Tracking

Procurement Process in iProcurement

  • Process 
    • Enter Requisition online using catalog form 
    • Workflow Approval 
    • Buyer Creates Purchase Order 
    • Supplier Notified and delivers directly to requestor 
    • Record Receipt in iProcurement 
  • iProcurement Process Flow in Oracle 
    • Ordering 
      • Requisition 
      • PO 
      • Receiving 
    • Analysis 
      • Payment 
      • Supplier Performance 
    • Sourcing 
      • Supplier Management 
      • Negotiations & Awards 
      • Catalog Content Management 

Why switching to iProcurement

Issues in conventional procurement systems are
  • Lack of procurement information 
  • Minimal coordination of common purchases across organizations 
  • Scarcity of formal contracts(Only available are BPA and CPA) 
  • Large complexity like more people involved 
  • Lack of standardized process or systems 

Benefits of iProcurement

  • It provides an intuitive web interface 
  • Goods and services can be found easily and added to the cart like any other online shopping portals 
  • Streamlines Order Placement - Shopping 
    • Shopping List 
    • Multiple Shopping Cart 
    • Copy orders 
    • Service Requests 
    • Non Catalog Requests 
    • Automatic Document creation 
    • Centralized Purchasing 
  • Streamlined Order Placement - Delivery 
    • Inventory Replenishment Requests 
  • Streamlined Order Placement - Billing 
    • Procurement Card purchases for Catalog orders 
    • Oracle project integration 
    • Multiple Account Distributions and Account generation workflow integration 
  • Streamlined Order Placement 
    • Notes - Additional Item information, Upload & view attachments 
    • Approvals - Approval routing configuration and Vacation scheduling 
    • Review/resubmit and Cancellation 
  • Desktop receiving 
    • Requestor can receive and confirm receipt of requested goods and services directly in iProcurement 
    • iProcurement can automatically record the receipt transaction 
  • Streamlines employee ordering 
  • Enforce purchasing policies 
  • Reduces procuring costs 
  • Easy to upload and view additional information 
  • Search product internally or from external sources 
  • Automatic document creation 
  • Center led procurement process 

R12 Enhancements

  • New Approval types 
  • New user-interface options 
  • New option for creating and maintaining favorite lists 
  • Unified catalog architecture 
  • Better catalog authoring capability for buyers, supplier and catalog administrators 
  • Tolerance based change request routing and Approval 
  • Content security enhancements 

Integration with other applications

  • Oracle Purchasing 
  • Oracle Payables 
  • Oracle Inventory 
  • Oracle Projects 

iProcurement in P2P flow

  • Setups 
    • Jobs 
    • Positions 
    • Employees 
    • Hierarchies 
    • Approval Groups 
    • Assignment sets 
    • Item categories 
    • Buyers 
    • Purchasing/Financial/Receiving options 
    • DFF for Item Categories 
    • Define Information templates 
    • Define Realms 
    • Setup Attachments 
    • Setup Profile options 
    • Enable Function Securities 

Item Availability in iProcurement

  • Internal Catalog: Items assigned to categories enabled for iProcurement 
  • External Catalogs: Managed by supplier/Third Part or Self-managed 

Flow

  • Requisition Creation 
  • Requisition Approval 
  • PO creation and processing 
  • Shipment of Goods 
  • Receiving of Goods 
  • Invoicing 
  • Payments
Note: underlined steps can be done in iProcurement, for others EBS integration needed with respective modules

Core features of iProcurement

  • Catalog Management 
  • Shopping 
  • Checkout 
  • Requisition Tracking and Management 
  • Desktop Receiving
    Read More

    November 18, 2016

    Back to Back(B2B) process is used for items that are not typically stocked nor manufactured. In an environment where lead times are often only a matter of 24 hours, the B2B process improves efficiency of the three steps above, by closely linking the Sales Order and the Purchase Order together.

    The B2B process automates the creation of a supply order (PO) when a sales order is booked. The supply order is hard pegged (hard-reservation) to the sales order that it is supplying so that once the PO is received, the items are not inadvertently taken by another order or demand. Where the sales order line is within the process, can be visible at all times so that customer service inquiries can be answered. 

    This process is also called Supply to Order.

    1. Customer orders items (OM).
    2. Purchase those items from the supplier (PO) and receive them into the warehouse.
    3. Ship those items to the customer (OM).

    Create a B2B Item

    Go to Inventory > Items > Master Items and define the item as follows :
    Enter item name and description.
    From Tools > Copy From, apply the Purchased Item template.


     In the Purchasing tab, enter a value in the List Price field.


     In the General Planning tab, set the Make or Buy flag to Buy


     In the Work in Process tab, make sure the Build in WIP flag is checked


      In the Order Management tab, check the Assemble to Order flag (ATO).


    Save, and assign to Organization M1
    B2B item must be created at item validation org.
    Same item in same item validation org cannot be both stock item and a B2B item

    Define Sourcing rule for the item

    Sourcing rules can be set up in PO to default sourcing information such as the supplier from which the item is purchased.


    Assign the item to the price list


    Back to Back Order Flow

    Create Order

    Go to OM > Orders, Returns > Sales Orders.

    Create a sales order with Order Type Mixed and enter the B2B item created in previous step in the lines for any quantity.
    Book the order. Note down the Order Number


     The line status will move to Supply Eligible (flow_status_code SUPPLY_ELIGIBLE).


    Place cursor on the line and go to Actions > Progress Order > Select Create Supply Order - Eligible to progress the workflow of the line 
     

    The line status will now show PO-ReqRequested/External Requisition Requested (flow_status_code PO_REQ_REQUESTED).

    OM has inserted a record in the PO requisitions interface table.


    Go to Purchasing > Reports > Run and run the concurrent program Requisition Import with the Import Source parameter = CTO. Leave the other parameters as default. The concurrent program can also be run from OM > Orders, Returns > Requisition Import.
    Go to View > Requests and verify that the Requisition Import has completed successfully.


    The line status of the sales order line will now show PO-ReqCreated/External Requisition Open (flow_status_code PO_REQ_CREATED)

    From the sales order line, go to Tools > Scheduling > Reservation Details > 'Supply' tab. Verify that the order line is reserved against the requisition. Note down the requisition number seen in this window.


    Go to Purchasing > Requisitions > Requisition Summary.

    In the Find Requisitions window, enter requisition number found in the previous step and click on Find.
    Verify that the status is Approved


    Go to Purchasing > Autocreate.
    From Edit > Clear > Record, clear any query criteria that may be defaulted like buyer, requester etc.
    Enter requisition number and click Find.


    Check the checkbox to the left of the line, and click on Automatic. Enter the Supplier and Supplier site such as the following and click on Create


     Once the PO created, enter the supplier and site details and once everything is OK, approve the PO


    The line status of the sales order line will now show PO-Created/PO Open (flow_status_code PO_CREATED)


    From the sales order line, go to Tools > Scheduling > Reservation Details > 'Supply' tab. Verify that the order line is reserved against the PO


    Go to Purchasing > Receiving > Receipts.

    Enter Purchase Order number and click on Find.
    In the Receipts window, check the checkbox to the left of the line and enter and save the receipt

    Go to Purchasing > Receiving > Receiving Transactions Summary.

    Enter the Purchase Order number and click on Find.
    Click on the Transactions button.
    Verify a Receive and Delivery transaction. This means that the B2B item has been received into Inventory.


    The line status of the sales order line will now show Awaiting Shipping (flow_status_code = AWAITING_SHIPPING).

    On the sales order line, Tools > Scheduling > Reservation Details will now show that the item is reserved against Inventory in Subinventory = FGI (PO has been received in this subinventory).

    The line can now be pick released, shipped and invoiced to the customer.

    This completes the Back to Back Order workflow.

    Useful queries

    Once you progress the order after Supply Eligible step, use below query to find whether the data inserted to requisition interface or not

    select * from po_requisitions_interface_all
    where interface_source_line_id = &order_line_id
    and interface_source_code = 'CTO';

    Read More

    September 11, 2015

    Sourcing Rule in Oracle Purchasing

    Sourcing rule is used to automatically replenish materials in an organization or business.
    Sourcing rules determine the movement of materials between organizations in a global enterprise; these organizations include the suppliers and the materials include those items made at the manufacturing organizations.

    Profile Options


    • MRP:Default Sourcing Assignment Set (set the value of the assignment set where you have added your item) 
    • PO: Automatic Document Sourcing (Yes) 
    • PO: Allow Auto-generate Sourcing Rules (CREATE AND UPDATE) 
    • PO: Allow Autocreation of Oracle Sourcing Documents (Yes)
    • MSC: ATP Allocation Method (User-Defined Allocation Percentage)

    Define an Item

    Noted Attributes:
    • Select any Inventory Planning method
    • Select the item Make or Buy
    • Enter a List price
    • Enter a default Buyer (this will help to assign a buyer during planning and in the requisition) 


    Define Supplier and Supplier Sites

    You can define supplier and supplier sites as required
    Purchasing --> Supply Base --> Suppliers

    Defining Sourcing Rule


    Purchasing -> Supply Base -> Sourcing Rule

    Notes:
    • You can use this rule across all orgs by Selecting All Orgs
    • If you want to use in specific org, the select the Org

    Shipping organization type is 3 types
    • Buy From: Buying from a supplier
    • Transfer From: If you want to transfer the item from another organization in your business
    • Make At: This is for making the item in the selected organization

    Allocation percentage: This is to identify how much % of the amount will be sourced from which org. This is helpful when you want to maintain multiple sources and want to split the sourcing amount between different sources, so you can split that by allocation%.
    Master Scheduling/MRP uses these allocation percentages when creating planned orders, which Purchasing imports as requisitions through Requisition Import. In a group of requisitions imported from Master Scheduling/MRP, those requisitions show the percentage allocation you define. In other words, at the end of a planning period, orders--as a group--to those suppliers approximately equal the percentage split you defined. However, when you create a requisition in Purchasing, Purchasing sources to the supplier with the highest allocated percentage. The Approved Supplier List (ASL) entry for that supplier is then referenced in order to pick up source document information (from a blanket purchase agreement or catalog quotation), if source documents exist
    Allocation Rank: To select the sequence in which sources will be identified during planning

    Sourcing Rule Assign set, add the item for the sourcing rule


    Once sourcing rules are defined, now time to assign the rule to Item or organization as you need
    Purchasing à Supply Base à Assign Sourcing Rules
    Here you can assign the sourcing rules at 4 different levels

    • Item 
    • Item-Organization
    • Organization
    • Global

    Add the supplier to Approved Supplied List


    This is optional, if you have checked ASL in Item attribute

    Purchasing à Supply Base à Approved Supplier List


    Run Min Max planning for the item


    Inventory à Planning à Min-Max Planning
    Submit the request for the item and make sure restock parameter selected as Yes

    Then run requisition Import

    This will create the Purchase Requisition and in turn submit the Create Releases Program which will in turn create the Purchase Order


    Read More

    September 6, 2015

    Internal Requisition to Internal Sales Order

    Creation Of Item

    Create an Item and assign that to both the source and destination organization
    Attributes
    • Purchased
    • Purchasable
    • Internal Order Enabled
    • Shippable
    • OE transactable

    Creation of Internal Requisition

    Now go ahead and create and Internal Requisition
    Go to Purchasing Responsibility
    Requisitions -> Requisitions

    Note: You should have been defined as an employee/ buyer to create a requisition

    1. Type should be Internal Requisition
    2. Enter the item in Lines Tab
    3. Enter Quantity
    4. Enter Need By Date
    5. Select the Destination Organization
    6. Destination Location
    7. Select Source Organization

    Click on Save, It will generate the Requisition Number. Note down the requisition number
    Now need to Approve the Requisition
    If you want to approve this requisition, then you should have required approval authority.
    Lets do the required setup
    Go to Human Resources (if Installed) responsibility
    People -> Enter and Maintain

    else in purchasing
    Go to Setup -> Personnel -> Employees
    Find the employee (if not created already, select new and create one)


    Select Assignment


    Here assign a Job
    Now lets go and check whether this Job has Requisition Approval authority or not
    For this, navigate to Purchasing responsibility
    Setup -> Approvals ->Approval Assignments


    In this form, select the Job which you have assigned to the employee


    Now you can see which all document types are authorized to approve


    Make sure Approve Internal Requisitions is entered here
    If you can’t see this, then add the value
    Make sure the Approval Group which you are assigning here that has the approval limit authorization with in which your IR amount comes
    As in this case

    Here the limit is max $50,000 and our IR amount is only $100
    Now Go back to the requisition and approve the same
    Query the requisition and click on the approve button

    Make sure Submit for Approval selected (it should be by default) then click on OK
    Wait for few min as the background process will check and clear the Approval workflow
    And re-query the IR again
    If Workflow Background Process not scheduled, you can go ahead and manually submit

    Now again requery the IR from requisition summary form


    You will see the IR is approved

    Creation of Internal Order

    Next step is to Run the Create Internal Order concurrent program which will interface the data to Order management for creating internal order
    Go to View -> Requests -> Submit a new request -> Single Request
    Select Create Internal Orders and submit


    Once the program is completed, check the log file,


    It means the data transferred to Order Entry
    Now lets go to Order Management and import the data to create the Internal Order
    Navigate to Order Management responsibility
    Go to Orders, Returns -> Import Orders -> Order Import Requests


    Now enter the below parameters
    1. Source as Internal
    2. Select your IR number in Order Reference field


    Then Click Ok and Submit.
    This will spawn another child order import program


    Now go ahead and query your Internal order which is just created by importing the data in order organizer form
    Orders, Returns -> Order Organizer
    Give today’s date to refine
    Select the source as Internal and give the IR number in the Order Source Reference


    Now Click on Open.
    Your internal order is ready


    Tables Involved in this process flow


    Differences between Internal Sales Orders and Inter-Organization transfer:

    • IR-ISO has approval process whereas there is no approval process for Inter-Org transfer
    • The IR cycle useful for more tracking, control (IR, SO), approvals and generating pick slips whereas Inter-Org transfer is a one step transaction, simple flow, more user friendly and no interfaces involved.
    • RMA is possible in Internal Sales Order whereas in Inter-Org transfer there is no functionality to Cancel, delete or Return or not receive an In-transit Shipment.

    When Internal Sales Order and Internal Requisition will be picked up by Inter-Company invoicing process?

    Internal sales order and Internal requisitions will be picked by Inter-company invoice process on the following conditions:
    • In shipping method, transfer type should be Intransit
    • Profile Option INV:Intercompany Invoice for Internal Orders value is Yes on site level. This will be used for creating Account Payable in the Intercompany Invoice process.
    Note: Intercompany AP will be created irrespective of the IR received or not as per the standard functionality, INCIAP does not check for the same, it considers only INCIAR created or not.
    Below query can be used to find out the eligible records

    SELECT RCTL.*
    FROM ra_customer_trx_lines_all RCTL, mtl_intercompany_parameters MIP
    WHERE RCTL.interface_line_context = 'INTERCOMPANY'
    AND RCTL.interface_line_attribute15 = 'Y'
    AND RCTL.interface_line_attribute4 = nvl(93,
    RCTL.interface_line_attribute4)
    AND MIP.sell_organization_id = to_number(RCTL.interface_line_attribute4)
    AND MIP.ship_organization_id = to_number(RCTL.interface_line_attribute5)
    AND MIP.flow_type = 1
    AND MIP.vendor_id is not null
    AND MIP.vendor_site_id is not null
    AND (line_type != 'TAX' AND extended_amount != 0)
    AND NOT (line_type = 'TAX' AND link_to_cust_trx_line_id is not null);
    Read More
    Copyright © . Oracle Apps (SCM) . All Rights Reserved
    Oracle Apps (SCM) is an online knowledge sharing blog which index online free tutorials, blogs and other sources, to get easier and accessible manner. The blog has been created keeping only one intention of sharing knowledge and for learning purpose. All trademarks, trade names, service marks, copyrighted work, logos referenced herein belong to their respective owners/companies. If any of the posting is violating copyright and you want us to remove that content. Please contact Here